Vehicle 3D Model
After attempting to Model the light cycle from Tron, and struggling due to it being hard to UV such a complex object, I decided to model Tesla's Cybertruck.
The first step was to set up a project file in Maya and name it with an easily identifiable name for the project, so I used "Cybertruck" as the file name.
Before I could start to create the model I needed to find a suitable reference image to use within an image plane. For this, I chose a side profile shot of the Cybertruck that I found on the official Cybertruck website.

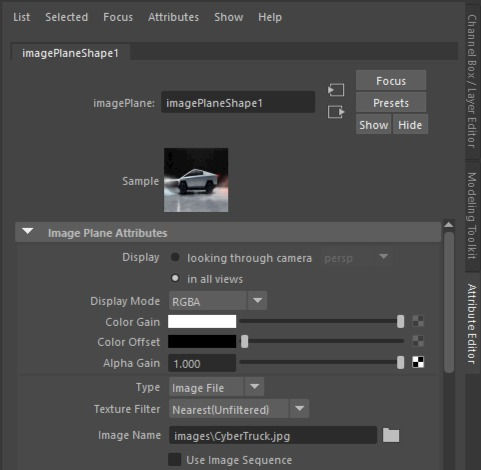
I saved it into the "images" file found within the project folders and then imported it into the scene using a free image plane which is created like this.

Select "Free image plane" from under the create tab to place a image plane within the scene.

When the image plane appears in the scene, click on it and look in the "Attribute editor". From here you want to find this window and click on the folder icon.

When you click on the folder icon it will allow you to find your image in the folder directories. look for the one you placed into your project folder and import it into the image plane.

Select "Free image plane" from under the create tab to place a image plane within the scene.
Now with the image on the image plane, I created a layer with the image plane selected and set it as a reference layer. This makes the image plane become un-clickable but still remain in the scene.
From here I took a basic cube and removed all the faces but one and started to manipulate the vertices into the shape of the image, using the multi-cut tool to add more vertices and edges to allow me to make it be as accurate as possible.

This roughly follows the shape of the Cybertruck as much as possible in 2D.
I decided not to do the detail on the wheels and instead decided I would do it with normals in Substance Painter.
The next step was to duplicate it and then extrude the edges to connect the two sides together.
I used another image plane to get a look at the Cybertruck from a different angle.


This was a relatively easy object to build but it still was hard due to my limited skill in 3D modelling and lack of knowledge on how to create a model.
I decided to not do the detail on the wheels and not indent the windows as I struggled to even create the slanted shape of the vehicle. This means I have to instead use Hard Surface stamps to try and recreate the shape of these parts in Substance Painter which is less than ideal and leads to a messy and unusable model outside of 'maybe' an out of focus object, which is still pushing it.
If I were to re-do this model I would make sure I've watched and followed along with some tutorials online that teach me better ways to approach modeling a complex object as I decided to follow the creative process I used in the Soda Can model that allowed me to create a good looking can.
Below shows some issues I struggled with during my modeling of this vehicle.


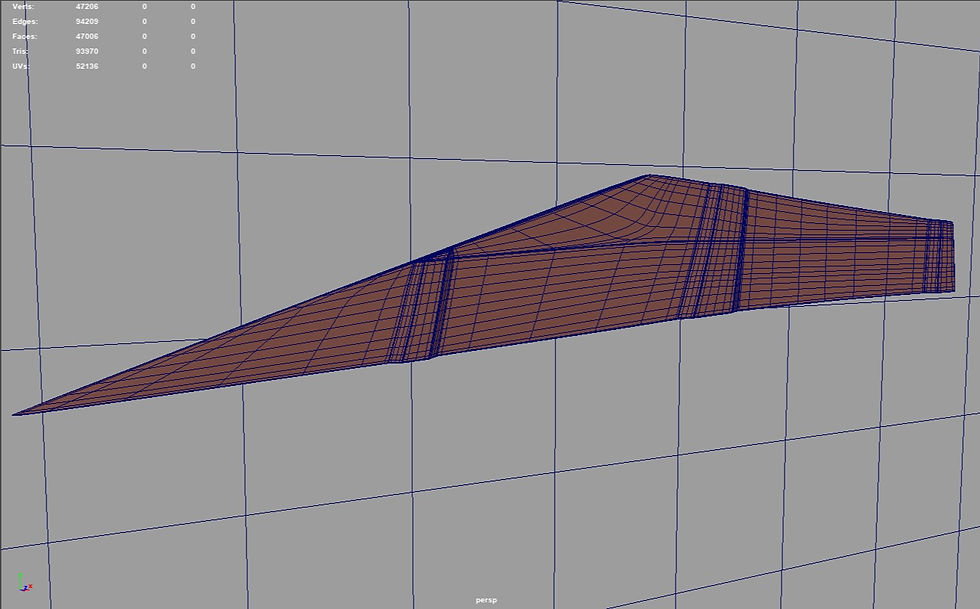
Randomly, be it because of my way of modeling or due to an extruding error, the model started to have these weird double faces that I had to work to delete before I could continue to model.
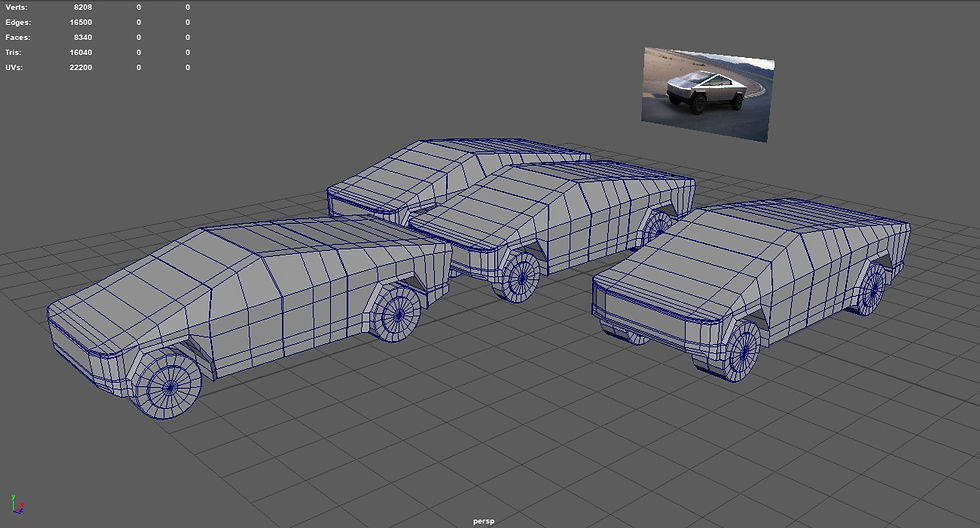
Additionally, there was a problem that sometimes when I switched to a different selection mode, for example, face mode, it would already have some faces selected and I would hold shift not knowing these are selected, which may have lead to the extruding problems and also lead to having 4 of the truck at one point when I was working on the wheels.
This cut into my creative time and made me take longer than I wanted and also frustrated me a lot, causing me to have to take many steps back from my work and taking a breather.
UV
After getting the model to a stage I was satisfied with I decided to get to work on unwrapping the UVs and laying them out.

The UVs originally looked like this, a complete mess.
I had to delete all of the UVs and then individually select some areas that were level to each other to use planar projections on, using y-axis, x-axis and z-axis projections as well as best plane projections.

Select the section of the object that you want to UV, bearing in mind that the UV will be projecting from one angle so should only be faces on one side of the object.

Find the "Planar" projection option under the "Create" tab in the UV editor and select the box for more options.

You may have an odd selection of faces, that are slanted or some other form, that will not work well with the typical planar projections and instead need to use the "best plane" option. The best plane option works out the best plane to project from automatically.

Select the section of the object that you want to UV, bearing in mind that the UV will be projecting from one angle so should only be faces on one side of the object.

Click this option in the "UV editor" to see if there are any Distortions or Compression.

After you project it is best to check if there is any compression or distortions in your UV. If there is you will have to unfold the UV, but it's best to unfold it even if you can't see any at first glance.

Now the UV is unfolded and the compression + any distortions should be taken care of, if not try to unfold again and if that doesn't work you may have to cut some parts, redo the projection or take a look to see if there are any problems in your mesh.

Click this option in the "UV editor" to see if there are any Distortions or Compression.

Select the box next to "Layout" under the "Modify" tab of the "UV Editor".

Make sure your layout settings look like this image then click "apply"


Select the box next to "Layout" under the "Modify" tab of the "UV Editor".
I highlighted all my UVs in the UV editor and selected Layout, with the option to translate and rotate shells selected as this will make sure all the UV shells have the same ratio in the layout while making sure it all fits into the 0-1 space. If it doesn't you may have to shuffle some things around yourself.
Textures
The next step was to export the model and UVs into Substance Painter.
As I started to texture the Cybertruck I started to notice more problems with the mesh, from sides not connected to more weirdly extruded sides and the fact that what I do in the 0-1 space is copied to all the other UV spaces.
Theses issues led to me returning to Maya many times to fix the model and caused me a great deal of frustration. This is something I would learn to overcome with more time put into both Maya and Substance painter but right now having only used both programs a handful of times they are still new programs to me.

Go into texture settings.

Add a material type of Emissive.

i also did the same with the headlights.

Go into texture settings.
Emissive Layers

Create a fill layer using any material, i used a smart material here.

RMB on the layer and add a black mask.

Change the colour of the brush in the bottom right corner.

Create a fill layer using any material, i used a smart material here.
Masks

The selection of hard surface brushes available are found within the hard surface section of the shelf. You can also import more into this shelf.

Select only normal in the material section of your brush and drag a hard surface stamp into the normal material section.


The selection of hard surface brushes available are found within the hard surface section of the shelf. You can also import more into this shelf.
Hard Surfaces

First create an object that you want to use for a hard surface stamp, it's best to use a smoothed object so you should reinforce edges with edge loops and then smooth it.

You can add more divisions to keep as much detail as possible. You also need to place a flat plane behind the object and line everything running perpendicular to the z axis.


First create an object that you want to use for a hard surface stamp, it's best to use a smoothed object so you should reinforce edges with edge loops and then smooth it.
Creating Normals

I started off by using a fill layer of Pure Iron to give it the metallic look of the Cyber Truck.

I then decided to focus on the black plastic looking part on the cybertruck that covers the underside and rim around the wheels and bottom segments.


I started off by using a fill layer of Pure Iron to give it the metallic look of the Cyber Truck.
Full Texture


Overall this wasn't a bad model. Through this, I learnt many techniques in both modelling, UVing and using painter, and will be able to create better models in the future thanks to everything I learnt.
However, as a model itself, it doesn't look great, from bad UVing to not being symmetrical the thing didn't turn out as a good product and could have been better.
The initial model had many problems and took a long time to create despite not doing the detailed wheels and windows. If I were to redo the model i would make sure to use more image planes, such as top view ones, to make sure the model stays accurate and also symmetrical, for which i would need to learn how to use the mirror and symmetrical tools. I would also make sure i do the detailed windows and also make the inside of the car so i could create transparent windows that let you see inside.
I also realised after creating the model that using the Speed Cut Plugin would have allowed me to create not only the windows but also the complex wheels. In the future I should take more time to plan out and think about how to make a model opposed to making it as simple as possible.
For the UV i would make sure i unfold every shell properly to remove all compression and learn how to project UVs quicker than i was doing.
For the texturing, i want to try and learn how to make sure textures stay in a certain area and stay straight. I also want to find out how to make sure edges have smooth textures instead of having weird holes or going over the edge. Finally, i want to attempt to create windows using the features available in Painter.